ETC5513: Reproducible and Collaborative Practices
Docker: The gold standard of reproducibility
Lecturer: Michael Lydeamore
Department of Econometrics and Business Statistics
Open Frame

Reproducibility using Docker
This is just for your information and it is not part of the material that is going to be examined.
Reproducibility using Docker
Docker is a program that allows to manipulate (launch and stop) multiple operating systems (called containers) on your machine (your machine will be called the host).
Source here.
Docker is designed to enclose environments inside an image / a container
What is a container?
A container is like a virtual machine. They have an operating system, but don’t simulate the entire computer.
Typically these operating system’s are stripped down to the bare minimum.
Containers are built using a set of instructions, which makes them reproducible
Why use a container?
Containers run anyway in a (relatively) standardised way, independent of the host operating system.
This means you can deploy a container on Amazon AWS, Azure, or on your own PC and the behaviour should be the same.
Docker is a way to set up, share, and deploy these containers, and is used very widely.
Docker Desktop
We will use Docker Desktop which gives us a visual interface to:
- Browse and launch containers
- Manage volumes
- View logs and resources
- Build images without the terminal
Step 1: Install Docker Desktop
- Download: https://www.docker.com/products/docker-desktop
- Follow the installation instructions for:
- macOS
- Windows
- (Linux users will need Docker Engine + extensions)
You may need to update your path. On Mac, do this by running
in the terminal
Step 2: Run a container
The rocker project provides R containers that we can use.
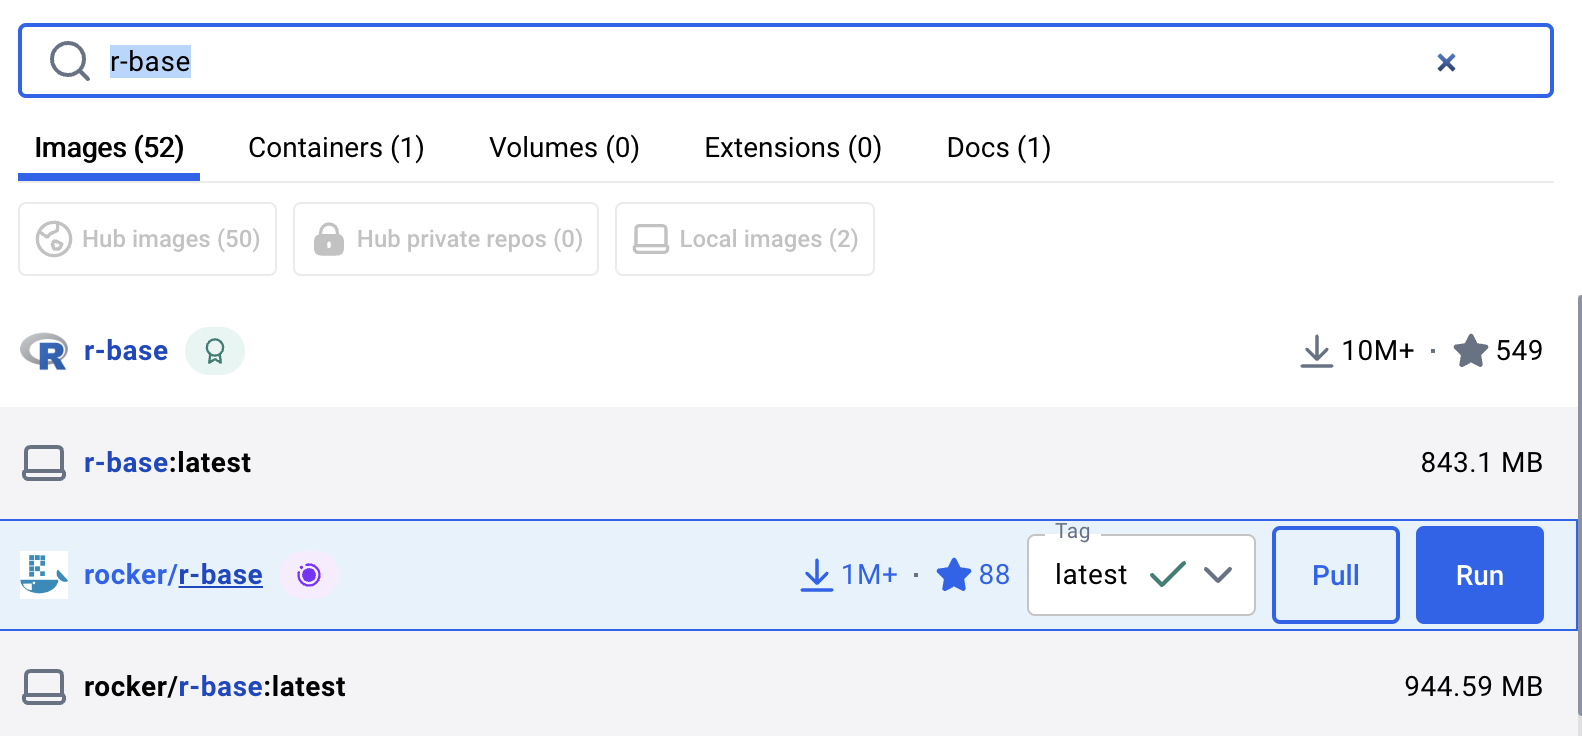
We can search for these inside Docker Desktop:

Press “Pull” to download the container
Step 2a: Running in the terminal
While it is possible to run containers inside Docker Desktop, it’s much easier to run them in the terminal.
To run the r-base container, we can follow the instructions on the container page.
This should launch you into a terminal R session!
Note the arguments:
-timeans “terminal, interactive”--rmmeans delete the container when it closes
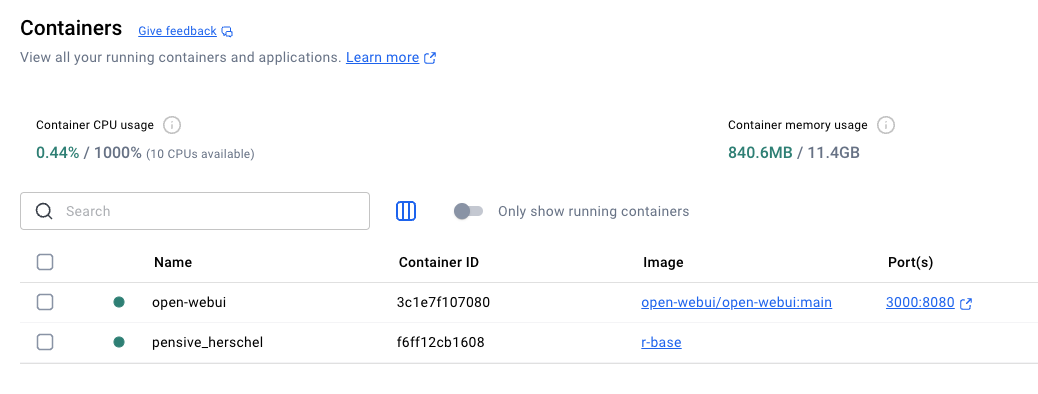
Checking if the container is running
You should be able to see the container inside Docker Desktop

And when you stop the container (with q()) it will disappear out of your list.
The Dockerfile
Docker containers are built using a Dockerfile. You can’t see these on Dockerhub (sadly) but most are on GitHub.
Here is the r-base Dockerfile:
## Emacs, make this -*- mode: sh; -*-

FROM debian:testing

LABEL org.opencontainers.image.licenses="GPL-2.0-or-later" \
      org.opencontainers.image.source="https://github.com/rocker-org/rocker" \
      org.opencontainers.image.vendor="Rocker Project" \
      org.opencontainers.image.authors="Dirk Eddelbuettel <edd@debian.org>"

## Set a default user. Available via runtime flag `--user docker`
## Add user to 'staff' group, granting them write privileges to /usr/local/lib/R/site.library
## User should also have & own a home directory (for rstudio or linked volumes to work properly).
RUN useradd -s /bin/bash -m docker \
    && usermod -a -G staff docker

## NB: No 'apt-get upgrade -y' in official images, see eg
## https://github.com/docker-library/official-images/pull/13443#issuecomment-1297829291
RUN apt-get update \
    && apt-get install -y --no-install-recommends \
        ed \
        less \
        locales \
        vim-tiny \
        wget \
        ca-certificates \
        fonts-texgyre \
    && rm -rf /var/lib/apt/lists/*

## Configure default locale, see https://github.com/rocker-org/rocker/issues/19
RUN echo "en_US.UTF-8 UTF-8" >> /etc/locale.gen \
    && locale-gen en_US.utf8 \
    && /usr/sbin/update-locale LANG=en_US.UTF-8

ENV LC_ALL=en_US.UTF-8
ENV LANG=en_US.UTF-8

## Use Debian unstable via pinning -- new style via APT::Default-Release
RUN echo "deb http://http.debian.net/debian sid main" > /etc/apt/sources.list.d/debian-unstable.list \
        && echo 'APT::Default-Release "testing";' > /etc/apt/apt.conf.d/default \
        && echo 'APT::Install-Recommends "false";' > /etc/apt/apt.conf.d/90local-no-recommends

ENV R_BASE_VERSION=4.5.0

# ## During the freeze, new (source) packages are in experimental and we place the binaries in our PPA
# RUN echo "deb http://deb.debian.org/debian experimental main" > /etc/apt/sources.list.d/experimental.list \
#    && echo "deb [trusted=yes] https://eddelbuettel.github.io/ppaR400 ./" > /etc/apt/sources.list.d/edd-r4.list

## Now install R and littler, and create a link for littler in /usr/local/bin
RUN apt-get update \
        && apt-get install -y -t unstable --no-install-recommends \
                libopenblas0-pthread \
        littler \
                r-cran-docopt \
                r-cran-littler \
        r-base=${R_BASE_VERSION}-* \
        r-base-dev=${R_BASE_VERSION}-* \
                r-base-core=${R_BASE_VERSION}-* \
        r-recommended=${R_BASE_VERSION}-* \
    && chown root:staff "/usr/local/lib/R/site-library" \
    && chmod g+ws "/usr/local/lib/R/site-library" \
    && ln -s /usr/lib/R/site-library/littler/examples/install.r /usr/local/bin/install.r \
    && ln -s /usr/lib/R/site-library/littler/examples/install2.r /usr/local/bin/install2.r \
    && ln -s /usr/lib/R/site-library/littler/examples/installBioc.r /usr/local/bin/installBioc.r \
    && ln -s /usr/lib/R/site-library/littler/examples/installDeps.r /usr/local/bin/installDeps.r \
    && ln -s /usr/lib/R/site-library/littler/examples/installGithub.r /usr/local/bin/installGithub.r \
    && ln -s /usr/lib/R/site-library/littler/examples/testInstalled.r /usr/local/bin/testInstalled.r \
    && rm -rf /tmp/downloaded_packages/ /tmp/*.rds \
    && rm -rf /var/lib/apt/lists/*

CMD ["R"]
The Dockerfile
It looks scary, but we can break it down.
FROM debian:testingStart from debian Linux
LABEL org.opencontainers.image.licenses="GPL-2.0-or-later" \
      org.opencontainers.image.source="https://github.com/rocker-org/rocker" \
      org.opencontainers.image.vendor="Rocker Project" \
      org.opencontainers.image.authors="Dirk Eddelbuettel <edd@debian.org>"
Do some labelling
The Dockerfile
RUN useradd -s /bin/bash -m docker \
    && usermod -a -G staff docker
Add a user
RUN apt-get update \
    && apt-get install -y --no-install-recommends \
        ed \
        less \
        locales \
        vim-tiny \
        wget \
        ca-certificates \
        fonts-texgyre \
    && rm -rf /var/lib/apt/lists/*
Upgrade linux stuff
The Dockerfile
RUN apt-get update \
        && apt-get install -y -t unstable --no-install-recommends \
                libopenblas0-pthread \
        littler \
                r-cran-docopt \
                r-cran-littler \
        r-base=${R_BASE_VERSION}-* \
        r-base-dev=${R_BASE_VERSION}-* \
                r-base-core=${R_BASE_VERSION}-* \
        r-recommended=${R_BASE_VERSION}-* \
Install R
CMD ["R"]Run R
The Dockerfile
Let’s try making our own Dockerfile building on top of r-base
FROM r-baseThe Dockerfile
Let’s try making our own Dockerfile building on top of r-base
FROM r-base
RUN Rscript -e "install.packages(c('palmerpenguins','dplyr','ggplot2'))"
The Dockerfile
Let’s try making our own Dockerfile building on top of r-base
FROM r-base
RUN Rscript -e "install.packages(c('palmerpenguins','dplyr','ggplot2'))"
CMD ["R"]Copying files into the image
A typical use-case for Docker contains is to include the completed code with an image.
Then, when someone else pulls the image, it will also pull the code.
For example:
FROM rocker/r-ver:4.3.1

# Copy code into the image
COPY ./my-analysis /home/rstudio/my-analysis

# Install any required packages
RUN R -e "install.packages('renv'); renv::restore()"

# Set working directory
WORKDIR /home/rstudio/my-analysis

# Default command (optional)
CMD ["Rscript", "run-analysis.R"]
RStudio Server
RStudio Server is a browser-based version of RStudio.
Initially developed for use ‘in the cloud’, it can be a convenient way to get RStudio to connect to Docker.
The Rocker project provides pre-built containers for RStudio Server: https://rocker-project.org/images/versioned/rstudio.html
We launch this almost the same way we’ve launched every other container:
The -d flag says ‘run in the background’
We have dropped the --rm flag so that the container persists between sessions - useful as a development environment!
Getting our files into the container
Of course, we can edit files and run them in the container. We probably want to get them out in some way.
We could:
- Download the files from the web interface
- Use
git: but then we would have to put that in our Dockerfile - “Bind” the working directory into the container
Binding folders
There are two types of bind: soft and hard.
Today we will only cover “soft” binding
Soft binding is basically ‘linking’ a folder from your host system into the container. We do that as part of the docker run command
docker run -d -p 8787:8787 --mount type=bind,source="($PWD)/<name>",target=/home/rstudio rocker/rstudioThis maps the directory /<name> into the RStudio container. Changes will persist.
docker-compose
The commands for launching a docker container can get very long
We may also want to deploy multiple containers running different programs
- A container running R
- A container running a database
- A container running a webserver
docker-compose is a tool that lets us set up all of our containers in a single command
docker-compose format
docker-compose with multiple services
Environment Variables
You might notice here the environment section. This is used to set environment variables.
Example: Set RStudio password
Also useful for: - API keys - R environment settings - Application config
Persistent storage
So far we’ve looked at
- Ephemeral storage inside the container
- Bind mounts on the host filesystem
There is a third option: persistent storage inside the container
Persistent storage
| Feature | Named Volume | Bind Mount |
|---|---|---|
| Lifecycle | Managed by Docker | Depends on host filesystem |
| Portability | Portable | Not portable |
| Performance | Slightly better in some cases | Depends on host OS |
| Use case | Container data | Dev code or custom config |
Persistent storage
Creating a volume:
And use it in a container:
Persistent storage
You can also do this in a docker-compose
Use-case: Sharing R Packages
You might have multiple containers that should have identical packages installed.
- Create the volume
Install packages using a container with
rlibsmountedMount the volume in your container
Use-case: Sharing R Packages
This is actually not a great idea, as it relies on:
- All containers using the same R version
- All containers using the same operating system
- Permissions have to be broad in the containers
- Containers are not isolated: installing new packages could be problematic
A better idea would be to create a new Docker image with the packages you need pre-installed.
Sharing containers
We have so far built containers locally using
We push our built containers to Dockerhub, much like we push our git repos to GitHub.
Sharing containers
First, login with
Build your container as follows:
Then push your container:
Cleaning up
Over time, your docker contains will probably accumulate. This includes:
- Containers
- Volumes
- Images
- Network mappings
We can clean these up with
Warning
Use with caution: deletes stopped containers and dangling images!
Summary
- Docker containerises our work, allowing others to deploy the container seamlessly.
- When paired with the code copying, others will get an (almost) exact copy of your analysis.
- Docker is used incredibly broadly, and some familiarity will put you ahead

ETC5513 Week 11